
[vc_row type=”full_width_content” full_screen_row_position=”middle” bg_image=”9″ bg_position=”center center” bg_repeat=”no-repeat” scene_position=”center” text_color=”light” text_align=”left” top_padding=”2.5%” bottom_padding=”2.5%” color_overlay=”#262f3f” overlay_strength=”0.95″][vc_column centered_text=”true” column_padding=”padding-3-percent” column_padding_position=”left-right” background_color_opacity=”1″ background_hover_color_opacity=”1″ width=”1/1″ tablet_text_alignment=”default” phone_text_alignment=”default”][vc_row_inner text_align=”left” el_id=”hide-it”][vc_column_inner enable_animation=”true” animation=”fade-in-from-bottom” column_padding=”padding-1-percent” column_padding_position=”bottom” background_color_opacity=”1″ width=”1/1″ delay=”200″][vc_column_text]
HUB Connector
[/vc_column_text][/vc_column_inner][/vc_row_inner][vc_row_inner bottom_padding=”30″ text_align=”left” el_id=”hide-it”][vc_column_inner enable_animation=”true” animation=”fade-in-from-bottom” column_padding=”no-extra-padding” column_padding_position=”all” background_color_opacity=”1″ width=”1/6″ delay=”300″][/vc_column_inner][vc_column_inner column_padding=”no-extra-padding” column_padding_position=”all” background_color_opacity=”1″ width=”2/3″][divider line_type=”No Line”][vc_column_text]
Execupay / Payroll Software
[/vc_column_text][/vc_column_inner][vc_column_inner column_padding=”no-extra-padding” column_padding_position=”all” background_color_opacity=”1″ width=”1/6″][/vc_column_inner][/vc_row_inner][/vc_column][/vc_row][vc_row type=”in_container” full_screen_row_position=”middle” scene_position=”center” text_color=”dark” text_align=”left” top_padding=”4%” bottom_padding=”0px” overlay_strength=”0.3″][vc_column column_padding=”no-extra-padding” column_padding_position=”all” background_color_opacity=”1″ background_hover_color_opacity=”1″ width=”1/6″ tablet_text_alignment=”default” phone_text_alignment=”default”][/vc_column][vc_column column_padding=”no-extra-padding” column_padding_position=”all” background_color_opacity=”1″ background_hover_color_opacity=”1″ width=”2/3″ tablet_text_alignment=”default” phone_text_alignment=”default”][divider line_type=”No Line” custom_height=”40″][vc_row_inner text_align=”left”][vc_column_inner column_padding=”no-extra-padding” column_padding_position=”all” background_color_opacity=”1″ width=”1/2″][vc_column_text]
HUB Connect
[/vc_column_text][/vc_column_inner][vc_column_inner column_padding=”no-extra-padding” column_padding_position=”all” background_color_opacity=”1″ width=”1/6″][vc_column_text]
+
[/vc_column_text][/vc_column_inner][vc_column_inner column_padding=”no-extra-padding” column_padding_position=”all” background_color_opacity=”1″ width=”1/3″][image_with_animation image_url=”6762″ alignment=”” animation=”Fade In” box_shadow=”none” max_width=”100%”][/vc_column_inner][/vc_row_inner][divider line_type=”No Line” custom_height=”40″][divider line_type=”Full Width Line” line_thickness=”2″ divider_color=”default”][divider line_type=”No Line” custom_height=”60″][vc_column_text]
How does HUB Connect integrate with Execupay?
[/vc_column_text][divider line_type=”No Line” custom_height=”60″][image_with_animation image_url=”6763″ alignment=”center” animation=”Fade In” box_shadow=”none” max_width=”100%”][divider line_type=”No Line” custom_height=”60″][vc_column_text]SwipeClock® integrates with Execupay through our API. Employee information from within Execupay is pushed to SwipeClock® so the two systems stay in sync. Please note that this integration is not designed to send information out of SwipeClock and into Execupay, so Execupay will need to be the primary system of record.[/vc_column_text][/vc_column][vc_column column_padding=”no-extra-padding” column_padding_position=”all” background_color_opacity=”1″ background_hover_color_opacity=”1″ width=”1/6″ tablet_text_alignment=”default” phone_text_alignment=”default”][/vc_column][/vc_row][vc_row type=”in_container” full_screen_row_position=”middle” scene_position=”center” text_color=”dark” text_align=”left” top_padding=”4%” bottom_padding=”0px” overlay_strength=”0.3″][vc_column column_padding=”no-extra-padding” column_padding_position=”all” background_color_opacity=”1″ background_hover_color_opacity=”1″ width=”1/6″ tablet_text_alignment=”default” phone_text_alignment=”default”][/vc_column][vc_column column_padding=”no-extra-padding” column_padding_position=”all” background_color_opacity=”1″ background_hover_color_opacity=”1″ width=”2/3″ tablet_text_alignment=”default” phone_text_alignment=”default”][divider line_type=”No Line” custom_height=”30″][vc_column_text]
Key Benefits of Integrating Execupay with HUB Connect
[/vc_column_text][divider line_type=”No Line” custom_height=”40″][divider line_type=”Full Width Line” line_thickness=”2″ divider_color=”default”][divider line_type=”No Line” custom_height=”40″][vc_row_inner equal_height=”yes” text_align=”left”][vc_column_inner column_padding=”no-extra-padding” column_padding_position=”all” background_color_opacity=”1″ width=”1/2″][vc_column_text]
Single Sign On (SSO)
No need to memorize multiple logins for Execupay and TimeWorksPlus.[/vc_column_text][/vc_column_inner][vc_column_inner column_padding=”no-extra-padding” column_padding_position=”all” background_color_opacity=”1″ width=”1/2″][vc_column_text]
Improve Client Retention
When your clients use Time & Attendance integrated with Payroll their retention increases.[/vc_column_text][/vc_column_inner][/vc_row_inner][vc_row_inner equal_height=”yes” text_align=”left”][vc_column_inner column_padding=”no-extra-padding” column_padding_position=”all” background_color_opacity=”1″ width=”1/1″][divider line_type=”No Line”][/vc_column_inner][/vc_row_inner][vc_row_inner equal_height=”yes” text_align=”left”][vc_column_inner column_padding=”no-extra-padding” column_padding_position=”all” background_color_opacity=”1″ width=”1/3″][/vc_column_inner][vc_column_inner column_padding=”no-extra-padding” column_padding_position=”all” background_color_opacity=”1″ width=”1/3″][nectar_btn size=”medium” button_style=”regular” button_color_2=”Accent-Color” icon_family=”none” url=”#” text=”Request a Demo”][/vc_column_inner][vc_column_inner column_padding=”no-extra-padding” column_padding_position=”all” background_color_opacity=”1″ width=”1/3″][/vc_column_inner][/vc_row_inner][/vc_column][vc_column column_padding=”no-extra-padding” column_padding_position=”all” background_color_opacity=”1″ background_hover_color_opacity=”1″ width=”1/6″ tablet_text_alignment=”default” phone_text_alignment=”default”][/vc_column][/vc_row][vc_row type=”in_container” full_screen_row_position=”middle” scene_position=”center” text_color=”dark” text_align=”left” top_padding=”4%” bottom_padding=”0px” overlay_strength=”0.3″][vc_column column_padding=”no-extra-padding” column_padding_position=”all” background_color_opacity=”1″ background_hover_color_opacity=”1″ width=”1/6″ tablet_text_alignment=”default” phone_text_alignment=”default”][/vc_column][vc_column column_padding=”no-extra-padding” column_padding_position=”all” background_color_opacity=”1″ background_hover_color_opacity=”1″ width=”2/3″ tablet_text_alignment=”default” phone_text_alignment=”default”][divider line_type=”No Line” custom_height=”15″][toggles style=”default”][toggle color=”Default” title=”How do I Enable the Execupay Integration?”][vc_column_text]The integration is enabled and configured in Execupay, but you will need to do the following in TimeWorksPlus before proceeding:[/vc_column_text][divider line_type=”No Line” custom_height=”20″][vc_column_text]
SwipeClock Preparation
[/vc_column_text][divider line_type=”No Line” custom_height=”20″][vc_column_text]
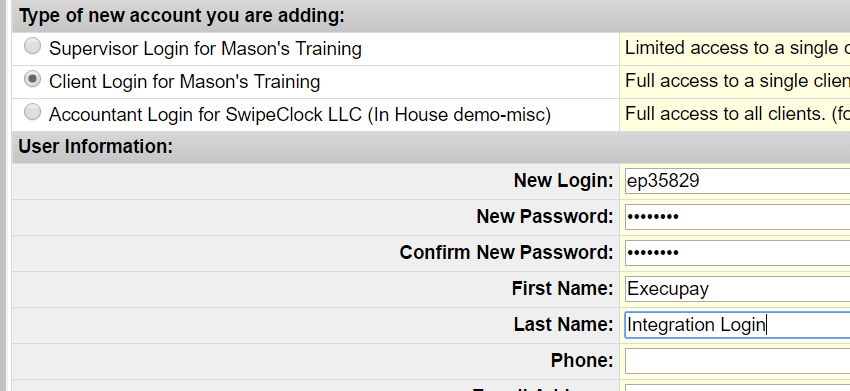
- Create a Client level login for the sole purpose of the integration. The login and password for this user will be entered in Execupay later. No actual user will ever use these credentials, it simply facilitates the connection between the two systems.
- Get the SwipeClock Site ID. This can be found in your Client List under the Site Code column.
[/vc_column_text][divider line_type=”No Line” custom_height=”20″][vc_column_text]Once you have these items, you can continue with the integration process in Execupay.[/vc_column_text][divider line_type=”No Line” custom_height=”20″][divider line_type=”Full Width Line” line_thickness=”2″ divider_color=”default”][divider line_type=”No Line” custom_height=”20″][vc_column_text]
Enable Custom Fields in Execupay
[/vc_column_text][divider line_type=”No Line” custom_height=”20″][vc_column_text]
- In Execupay, select the Client. Under Company, choose Edit Company.
- Select the Custom Fields tab
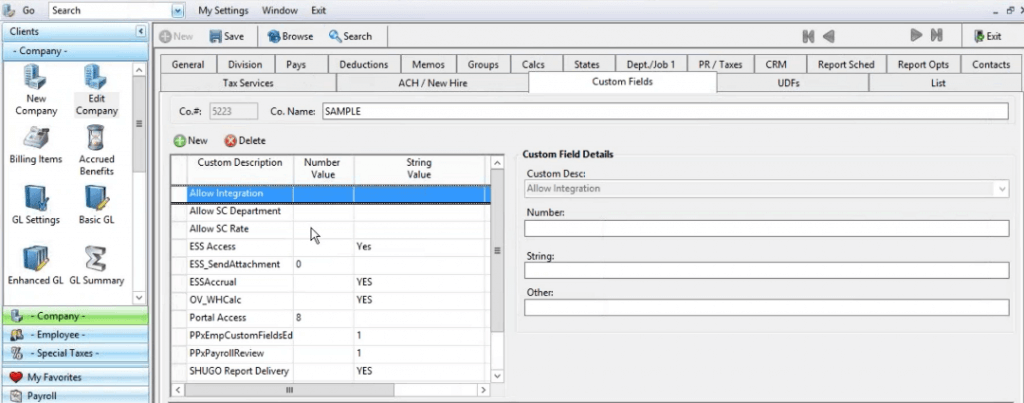
- Enable
- Allow Integration
- Allow SC Department
- Allow SC Rate
[/vc_column_text][divider line_type=”No Line” custom_height=”20″][vc_column_text]You may also need to enable TLM Custom Mapping, although you do not need to add anything in the String Value field. Once the integration is turned on, it will populate automatically.[/vc_column_text][divider line_type=”No Line” custom_height=”20″][vc_column_text]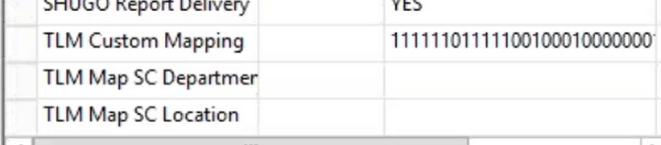 [/vc_column_text][divider line_type=”No Line” custom_height=”20″][divider line_type=”Full Width Line” line_thickness=”2″ divider_color=”default”][divider line_type=”No Line” custom_height=”20″][vc_column_text]
Turn On Integration
[/vc_column_text][divider line_type=”No Line” custom_height=”20″][vc_column_text]
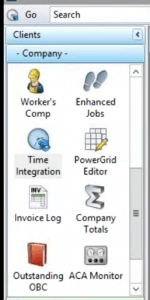
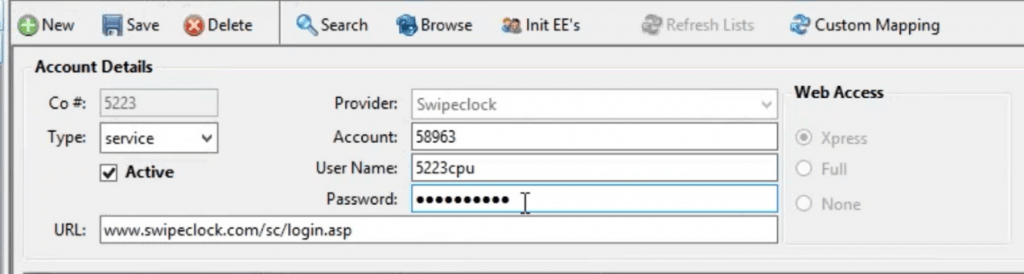
- In the company settings, choose Time Integration
- In the Provider drop-down, select SwipeClock
- Enter the Login, Password and Site ID from TWP in the Account Details. This is the data you created in the previous steps.
- For the URL, use www.swipeclock.com/sc/login.asp
- See the following section, What Data Maps Between Execupay and SwipeClock for information on employee field mapping.
[/vc_column_text][divider line_type=”No Line” custom_height=”20″][/toggle][toggle color=”Default” title=”What Data Syncs between Execupay and SwipeClock?”][vc_column_text]When the account details are setup, you can proceed to select the fields that will be pushed to SwipeClock. Use the Custom Mapping button to present the following checkbox list.[/vc_column_text][divider line_type=”No Line” custom_height=”20″][image_with_animation image_url=”6785″ alignment=”center” animation=”Fade In” box_shadow=”none” max_width=”100%”][divider line_type=”No Line” custom_height=”40″][vc_column_text]IMPORTANT: Password should never be mapped to SwipeClock since it will overwrite the employee’s timekeeping password.
The following fields can be integrated between Execupay and Swipeclock:[/vc_column_text][divider line_type=”No Line” custom_height=”40″][vc_column_text]
- Designation
- Title
- SSN
- Department
- Supervisor
- Start Date
- End Date
- Phone
- Lunch Minutes
- Auto Lunch
- Hours
- Pay Rate 0-3
- Options
- Card Numbers 1-3
- Home 1
- Home 2
- Home 3
- Schedule
- Export Block
[/vc_column_text][divider line_type=”No Line” custom_height=”40″][image_with_animation image_url=”6786″ alignment=”” animation=”Fade In” box_shadow=”none” max_width=”100%”][divider line_type=”No Line” custom_height=”40″][vc_column_text]Once you have mapped the fields, click Save and Exit. The integration will run according to your defined schedule, but you can manually run the integration with the Init Active Employees under the Init EE’s menu.[/vc_column_text][divider line_type=”No Line” custom_height=”40″][vc_column_text]Please keep in mind that for this integration to function, the Employee # field from Execupay must match the “Employee Code” field within SwipeClock®. When a new employee is added into Execupay, please be sure to enter an Employee # and then this data will automatically be copied into SwipeClock® when the employee is created there. For updating existing employees (individuals existing already in both systems), if the Employee # and Employee Code field values do not match, it will result in duplicate entries being created within SwipeClock® rather than existing data being updated.
**Note** The integration is only designed to automatically push changes made in Execupay into SwipeClock®. If you make an update in SwipeClock® directly, it will not be updated automatically in Execupay.[/vc_column_text][/toggle][toggle color=”Default” title=”How do I View an Employee in SwipeClock?”][image_with_animation image_url=”6788″ alignment=”center” animation=”Fade In” box_shadow=”none” max_width=”100%”][divider line_type=”No Line” custom_height=”40″][vc_column_text]To view the employees within SwipeClock, log into your SwipeClock account directly and click on “Employee Setup” from the left-hand column. Then, click on the name of an employee to view their information in more detail. You can then fill out any additional details within the SwipeClock interface.[/vc_column_text][/toggle][toggle color=”Default” title=”Where do I go for Support for this Integration?”][vc_column_text]If you are an existing customer using this integration, please be aware that this integration is supported by Execupay.
For support regarding this integration, please contact Execupay’s support team by email: support@execupay.com or by phone: 877.366.9511.[/vc_column_text][/toggle][/toggles][/vc_column][vc_column column_padding=”no-extra-padding” column_padding_position=”all” background_color_opacity=”1″ background_hover_color_opacity=”1″ width=”1/6″ tablet_text_alignment=”default” phone_text_alignment=”default”][/vc_column][/vc_row]